Page 1 of 1
Using floss cards
Posted: Mon Jul 28, 2014 7:35 pm
by mattcrossstitches
I bought a few packs of those punched floss cards for projects (where you can note the symbol, number, etc., and then tie the floss on with a ring knot). Those who use them -- Do you have a system (e.g. how much floss do you cut off at one time to add to the card, what lengths, do you pull strands off without untying the knot, etc.)?
Re: Using floss cards
Posted: Mon Jul 28, 2014 8:38 pm
by MaggieM1750
Heres a discussion that was started similar to this not long ago.
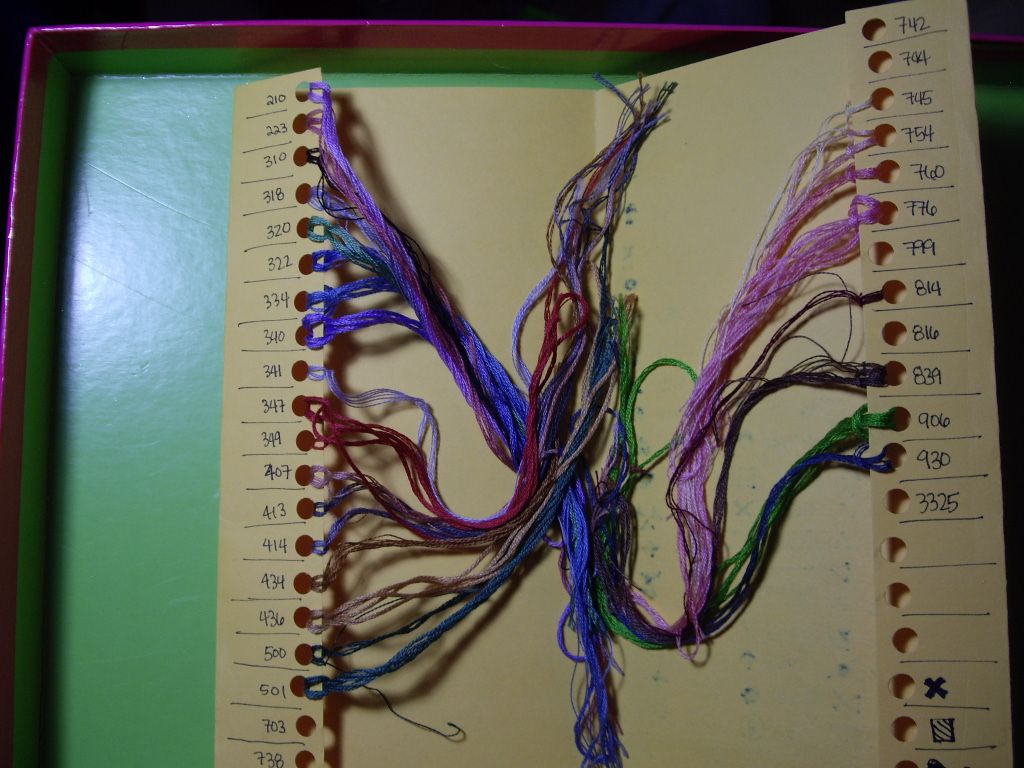
This is what I do with

I punched the holes in the card and drew on the symbols
Its sort of small, but on the right side, 2nd from the top, there are 2 different thread loops.
I keep one of all the thread, the second one is the length of thread I've pulled strands from.
If I have blended colors, I'll pull one length of each color, loop together. Then 1 strand of each color and loop that onto the card.
I make up these floss cards when I am traveling with a project.
I'll either punch holes in an index card, or I'll cut a strip from a cereal box.
How much I cut, and how long I make each length.. all depends on how much I estimate the color will be used, or how much I'll need while I am travelling. I keep my thread length about 15-20" Sometimes longer, sometimes shorter. If I am cutting a color that is used a lot in the background, I'll cut more than I would for a color that is just used in a small area. Just a quick scan of the pattern, or by looking at the cover photo.. you know which colors you'll need more of.
Re: Using floss cards
Posted: Mon Jul 28, 2014 11:08 pm
by Ruthi
I am pretty much the same, except that I bought some cards a long time ago, and am still using them so don't need to make my own. But I probably will now I know how flimsy the ready made ones are.
I guess how much thread I will need and cut off what my estimate is of what I will need, or a whole skein if that is less than the total. Then as I get towards the end I just cut off a length or two extra when I run out. I use floss bags, so its no disaster if there is a little too much cut.
I untie the knot every time I need to pull a thread - I find its easier than wrestling with a thread that is trying to cut through the card.
Re: Using floss cards
Posted: Tue Jul 29, 2014 2:55 am
by NeedleAndFork
Here's a photo of how I make my floss cards..
It's a sheet of cardstock folded in half (that middle crease you see) with the ends folded inwards. I knot the floss onto there so that when I'm storing the floss, I can just fold the entire thing in half so it closes like a book with all the floss tucked inside.
In the case of this project several colors were used multiple ways - as 2 strands, 3 strands, 4 strands, and in blends, each with a separate symbol. So rather than draw the symbol next to each length of floss I did that on the outside like this:
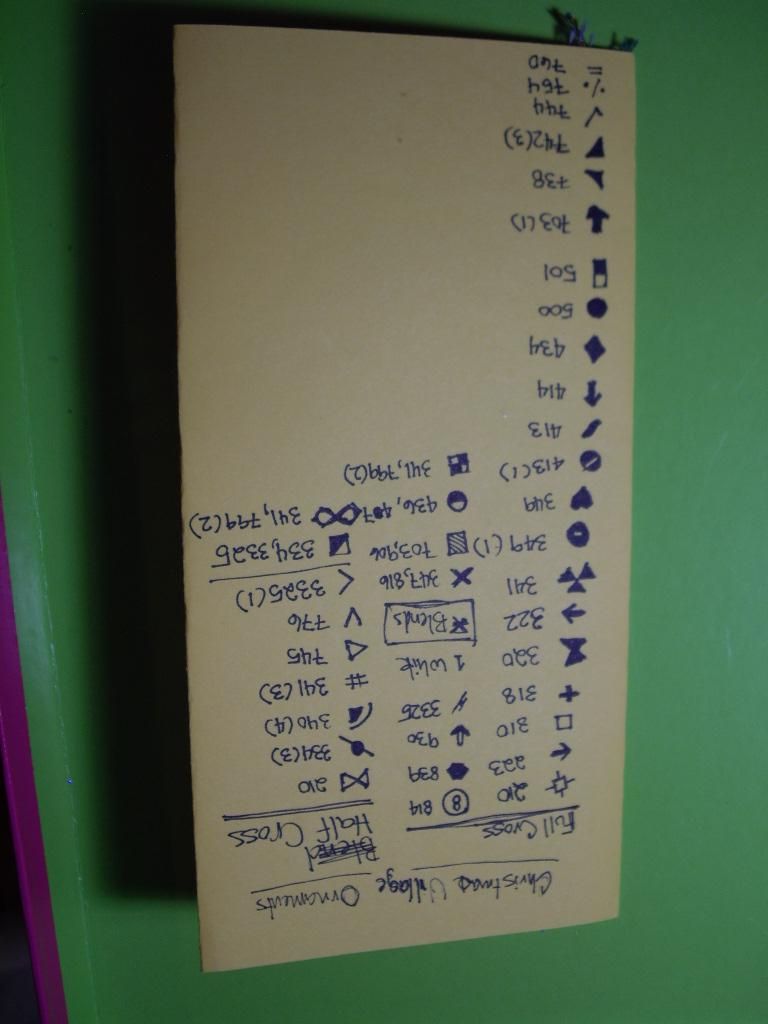
You can see inside I did draw a few symbols - those are the blends - when I needed a blend I pulled a strand from each place the full 6 strands were, and I 'parked' leftovers that were already blended in the holes with the symbols next to them rather than numbers.
I have 2 standard lengths that I cut floss to - based on the diagonal length of my floss box, since I bobbinate. I picked that because I'll always have a box around when I am cutting floss, so I don't have to find a ruler or estimate lengths. For HAEDs or projects that are on high count fabric, or for colors not used a lot on lower count fabrics I cut a single diagonal length of my bobbin box. For lower count fabrics or stitching over 2 on high count where floss gets used up much faster and doesn't show wear and tear from passing through the fabric as often, I measure the diagonal with my floss, and double it and cut that.
If I'm stitching at home usually I'll cut just a single length of each color, unless I'm working in large areas of a single color, then I might cut two. If I'm taking my stitching somewhere with me, I'll look over the areas I plan on stitching next and if I think a single length isn't going to be enough, I'll cut more. Most of the time I don't bother though, since I can just work on a different part of the piece instead.
When I'm done with a project, I toss the project card into a box - I've got a growing collection! When starting a new project, I go through the existing cards I have and pull any of the colors I've already cut and have left over from older projects first before cutting new lengths of floss. This works out well because often you need a color for just a few stitches, and rather than cutting another length for it, I might already have it cut from a previous project.
I still need to find a better way to store my leftovers. I don't want to wind them back on the bobbins - just the idea of a bobbin box with ends flapping around makes me twitchy. I've been trying to think of ways to DIY something similar to the Annies Keepers for storing my left over floss but I haven't come up with anything yet.
Re: Using floss cards
Posted: Tue Jul 29, 2014 3:29 am
by pattiebelle
I don't use floss cards. I stitch at home all the time and just cut lengths off bobbins from the box. The length I cut is about 36inches and fold in half for loop start.
You've gotten some really good ideas from the stitchers who do use the cards, tho. I hope you find what works for you.
Re: Using floss cards
Posted: Tue Jul 29, 2014 11:12 am
by richardandtracy
I'm only on my sixth project so don't have a lot of experience in this, but here's my way:
I learnt a way of doing it from the first kit a had and incorporated a modified version of that in my chart making program (which I have used for projects 2 onwards).
Each colour is allocated a symbol number based on how many stitches there are, 1 = colour with most stitches, 2 = next most common colour.. etc. right to the least common colour. Each sheet of the chart has a simple key at the top giving the symbol & symbol number. Then I have a detailed key on a separate sheet, giving the cross reference between the symbol, its number, the DMC number (which is too long to put on each chart sheet) and the DMC name. My floss card is a bit of 2mm polythene sheet drilled with holes and engraved with the symbol number next to the hole. I cut off 5 skein lengths of 6 strands from the skein, tease out one thread, put that on the needle, then store the remaining 5 on the floss card under the correct symbol number. That way there are never more than 5 threads bunched up together through each hole on the floss card. The unused parts of the skein remain with their identifiers in the post bag they were sent to me in.
There are 31 holes on my floss card, and so far it has been enough. The next one though, will make me re-think slightly as it will have 100 colours. In order to facilitate this, I've added a section to my chart making program to print out how many stitches of each colour are on each chart page, and it may turn out that there are no more than 31 colours on any page of the chart. I shall have to see.
Regards,
Richard.

