A small thing, but mine own! Just started the stem stitch on this lovely little fox. Sorry that the image is rotated wrongly, it seems to be something to do with iPhones!
Thank you everyone for your kind comments. The instructions say to stitch a double row of stem stitches around the body of the fox. I'm presuming this is different from 'double stem stitch'? It only shows stem stitch in the little booklet with the kit, but I saw 'double stem stitch' when I was googling. Unfortunately, I can't find a video for this. I'm hopeless with diagrams and have to see it actually being done. It would seem to be much easier (to me) to do double stem stitch, rather than try to have two neat lines of stem stitch. Or maybe it's because I find it difficult to be really neat! Any thoughts appreciated.
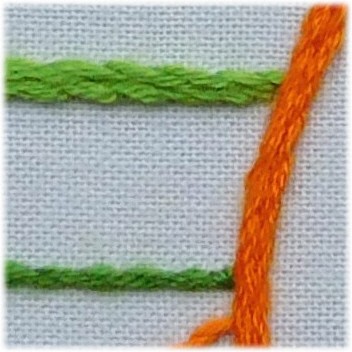
Great start Genevieve! As far as I know there is no such thing as "double stem stitch" (there is cable stem stitch, where you alternatingly have the working thread above and below, but that's a different thing) and here what is needed is definitely a double row of stem stitch. If you look in my Other Stitching thread in the SAL section you'll see this fox and the stitches - if you like I can send you a close-up of the double row of stem stitch, if you think that might help?
Just in case . It doesn't actually show up very well in the orange, but the light green is a double row of stem stitch as well and shows the texture a bit better.
I think the only thing to remember is to stitch both lines of stem stitch in the same direction.
Thank you so much, Mabel, that is extremely helpful. Well, I've worked on it this afternoon, and, while it's nowhere as neat as yours, it doesn't look too bad. I did find instructions for the double stem stitch:
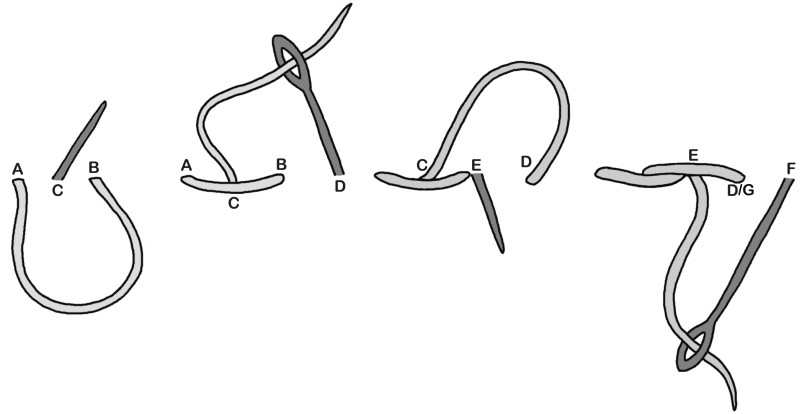
I had a go, but just couldn't work out how the top row is created, so gave up in frustration in the end. I could do, A,B and C, which is the straightforward stem stitch, but was totally lost when it came to D. Maybe you'll have a better idea of how it's worked.
Genevieve, I'm intrigued now - I clicked on the link in your post and it takes me to Stitch School, but even when I click on the stem stitchcategory I can't find "double stem stitch" anywhere. And I would really like to know what it is now !!!
It was a blog on Stitch School dated 19 May 2012 - also called Alternate Stem Stitch. If you click on the Archive on the right for 2012, then scroll down until 19 May. It's the sixth blog post down. I'd be really interested to know what you think.
OK, got it now. It's what I called cable stem stitch in my earlier post. It's basically a combination of stem stitch and outline stitch - working from left to right, when you do your first stitch you keep the working thread below the needle as for normal stem stitch, then on the second stitch you keep the working thread above the needle as for outline stitch, and you alternate between the two (hence the name used in the blog).
I did some diagrams for this stitch recently, to use in my chart packs - I'll post them here for your personal use, and if they're not clear do ask and I'll try to explain!
It all makes sense now, Mabel, thank you very much. I was confused because I'd read it as though there were two lines of stem stitch, but I can see now how it works. Thanks again.
As always Mabel's diagrams explaining stitches are the best I have ever used. Yay! for our Mabel coming to the rescue again!!!
Carole
WIPs
Star Wars Afghan:Chewbaca
HAEDs:
O Kitten Tree
Dancing with the Cat
Everything else "on hold"
2022 Finished: Star Wars Afghan: Princess Leia, Obi-Wan Kenobi, Yoda, Finn, Rey, Poe, Han Solo,Darth Vader, BB8,Luke Skywalker
I read that it's a good idea to put a piece of material (voile) behind the embroidery so that it gives you somewhere to secure your thread. I haven't got voile so put another piece of cotton material behind, then found out that I could only get my needle through with a great deal of difficulty. By this time I had already stitched the fox's legs and was onto his tail, although my hand was really hurting! So, I undid the legs and the tail and took away the extra material. Then, the one and only needle threader I had broke and there was no way I could thread four threads into the tiny eye of the needle. So, I've now spent some money on a pack of 25 needle threaders and some voile and made myself a cup of tea!